Computer Repair, Networking, Virus Removal, Data Recovery, Spyware & Adware Removal, Wireless Security, Troubleshooting, Printer Repair


Onsite Support
1-800
306-2239
Instant response- Onsite Service - hardware, software & peripheral repair/maintenance
![]()
OUTLOOK 2000, OUTLOOK 2003 & OUTLOOK EXPRESS
JUNK MAIL FILTER ACTIVATION PROCEDURE
The following procedures were tested with Outlook 2003 which is bundled with the Office 2003 software suite. You can determine your version by opening Outlook and clicking on Help > About Microsoft Office Outlook.
Open Outlook by double-clicking on the Outlook icon located on your desktop.

Click on Tools > Options.
Onsite home & office computer repair service available
![]()
![]()
![]()
![]()
![]()
![]()
![]()
![]()
![]()
![]()
![]()
AST
PowerSpec
All Desktops & Servers
![]()
![]()
![]()
![]()
![]()
![]()
![]()
![]()
![]()
![]()
![]()
![]()
We offer computer repair at affordable prices and guarantee all our work.
Click on the Junk E-mail... button.
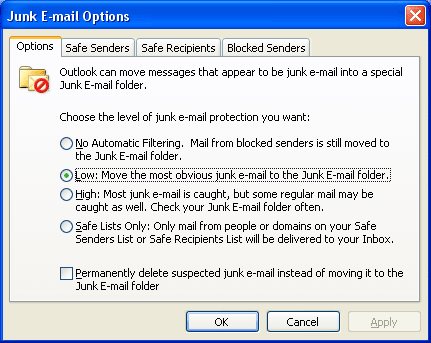
 The first "Options" tab is where you control the junk filter.
 No Automatic Filtering essentially turns off the junk e-mail filter.
Low will only filter junk e-mail if it scores a high spam confidence level (SCL) rating.
High will filter junk e-mail if it scores a medium SCL rating. The lower the rating, the less likely the e-mail is spam.
Safe Lists Only turns off the junk e-mail filter and will only allow e-mail to be delivered to your inbox if the sender or the recipient is listed in the "Safe Senders" and "Safe Recipients" lists. You might use this option if you have the attitude "If I don't know the sender of the e-mail, it's spam". This may be ok for personal e-mail but this is definitely not an option for businesses attracting new customers.
The last option allows you to "Permanently delete" junk e-mail. If, after you have been using the junk e-mail filter for some time, you notice that the filter has never filtered one of your legitimate e-mails into the Junk E-mail folder, then you might consider simply deleting the filtered spam e-mail rather than keeping a copy for your review.
Continuing from the previous step, clicking on the "Safe Senders" tab yields a control panel which allows you to add and remove contacts who are your friends and colleagues. This list overrides the Junk E-mail filter and protects any messages sent by your friends or colleagues from being filtered into the Junk E-mail folder.
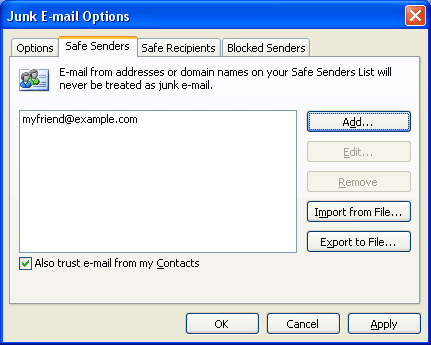
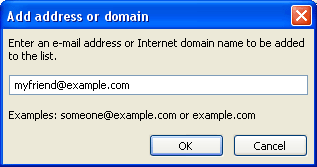
To add a contact, simply click the "Add..." button, enter the person's e-mail address, and click "OK". You may also include entire domains by adding "example.com" which will treat all e-mail arriving from example.com as a safe sender.
The "Remove" and "Edit..." buttons allow you to remove a contact or edit the email of an existing contact.
The "Import from File..." and "Export to File..." are used to backup and restore your Safe Senders list.
Placing a checkmark next to the "Also trust e-mail from my Contacts" essentially adds all the e-mails of your contacts to this list. You won't visibly see the addition of your contacts e-mails to the list but they will not be filtered against. It's always a good idea to keep this checked. You wouldn't have a spammer in your list of contacts would you?
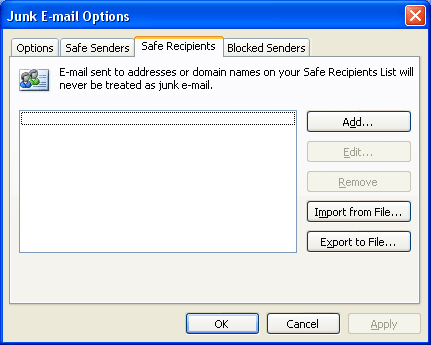
Continuing from the previous step, clicking on the "Safe Recipients" tab yields a control panel which allows you to add and remove e-mails and domains for which you would like to accept e-mail delivery. It is designed for newsgroups and discussion lists in which you participate but where the messages are not specifically addressed to you. Simply add your newsgroup email or domain and the newsgroup messages will not be treated as junk.
Blocked
Continuing from the previous step, clicking on the "Blocked Senders" tab yields a control panel allowing you to add e-mail addresses or domains which will always be treated as junk e-mail. This can be considered a "blacklist" of spammers. Be careful in adding domains because if you add hotmail.com, for example, all email@hotmail.com will be treated as spam.
Don't spend too much time updating my blocked senders list as Spammers typically change their email and domain quite often - usually hours after a spam campaign. By tenaciously adding their e-mails to the "Blocked Senders" list, you will quickly find that you have a list of e-mails that no longer exist. However, this list is useful if you have a repeat offender that continues to spam you time and time again.
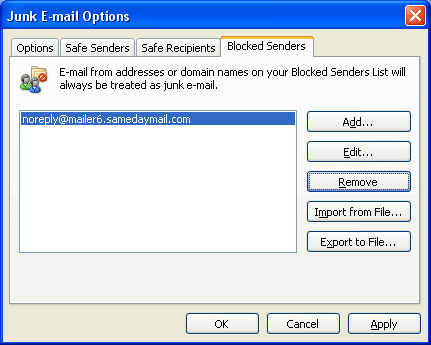
The "Remove" and "Edit..." buttons allow you to remove or edit a spammer’s e-mail address.
The "Import from File..." and "Export to File..." are used to backup and restore your Safe Senders list. They also are useful in sharing your list with your friends and colleagues.
Microsoft continuously updates the Junk E-Mail Filter. Therefore, you will want to use the Office Update feature to keep Outlook up to date.
Click on Help > Microsoft Office Online.

On the right hand side of Microsoft's web site, click "Check for Updates".
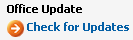
Follow the onscreen instructions to update your Microsoft Office Package.
Microsoft's description of the Junk E-mail Filter can be found here.
Microsoft's Outlook 2003 home page, including the "Check for Updates" link.
OUTLOOK 2000
The basis for this procedure is to use "catch" words or phrases that spammers use in their emails that you do not normally use in your personal emails. For example, spammers may use the word "MLM" or the phrase "debt consolidation". We will create a filter to key in on these words and phrases and move all mail containing these words to the SPAM folder for later review. The reason why we move them to a designated folder rather than deleting them outright, is so that we catch any personal mail that may have been trapped by the filter. Every once in awhile you will want to delete all the mail in the SPAM folder after quickly reviewing its contents to make sure there are no unread personal emails.
The following procedures were tested with Outlook 2000 which is bundled with the Office 2000 software suite. You can determine your version by opening Outlook and clicking on Help > About Microsoft Outlook.
![]()
Open Outlook by double-clicking on the Outlook icon located on your desktop.

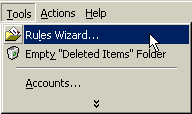
Click on Tools > Rules Wizard.
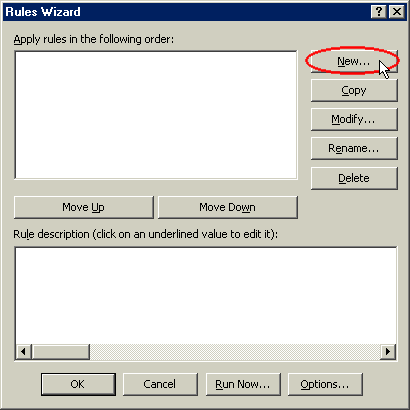
Click on New.
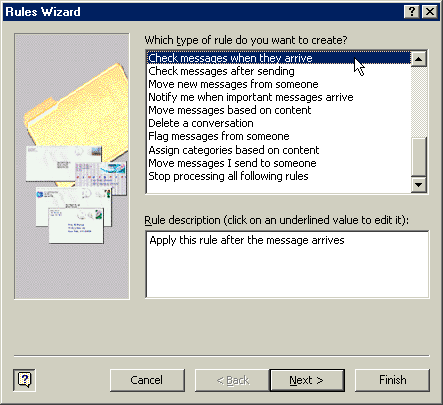
Click on "Check messages when they arrive" and then Next >.
First, click the box next to "with specific words in the subject" - later you may want to repeat this exercise clicking "with specific words in the body".
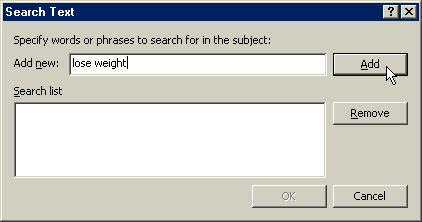
Second, click the specific words link in the bottom text box.
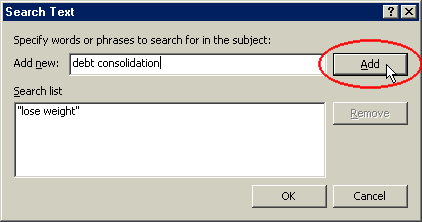
[Note the many different conditions that allow you to set up specific rules in handling your email. The "Rules Wizard" is a very powerful tool that is worthy of spending some time learning its capabilities]A new dialog box will appear where you can Add as many words or phrases as you would like. A good approach is to read you SPAM mail as you receive it in order to choose words that are specific to the SPAM messages that are unlikely to be found in your personal email. I have added "lose weight" as an example. You may always return to this dialog menu to add new words later so don't worry about being too comprehensive. When you are finished, click OK and then Next >.
First, click "move it to the specified folder".
Second, click the "specified" link in the bottom text box.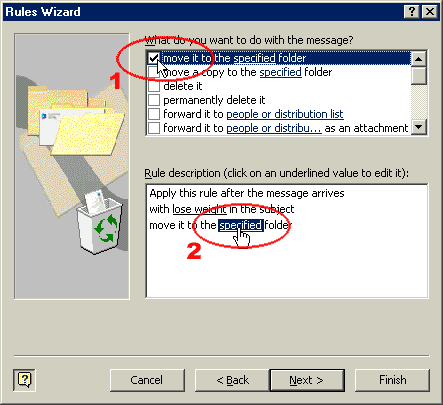
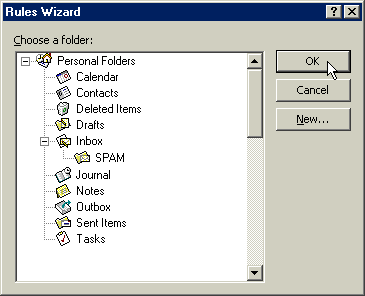
First, highlight the "Inbox" by clicking once.
Second, click the "New" button.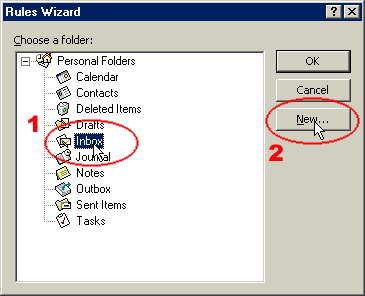
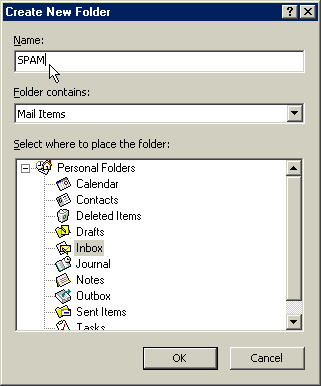
Type "SPAM" in the "Name:" text box and click OK.
Click "OK" and then "Finish" in the next dialog box.
Click "Rename..." to rename the rule we just created.
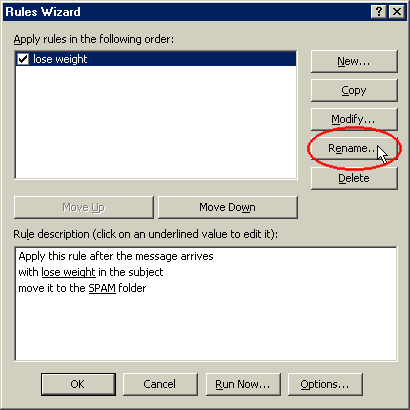
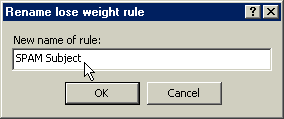
Erase "lose weight" and choose a name for the specific rule that you just created. I named the rule "SPAM Subject" to reflect that I am trapping SPAM by using keywords and phrases in the subject line of incoming emails. Click "OK" and you will be returned to the main menu.
You have just created your first rule and now have two options:
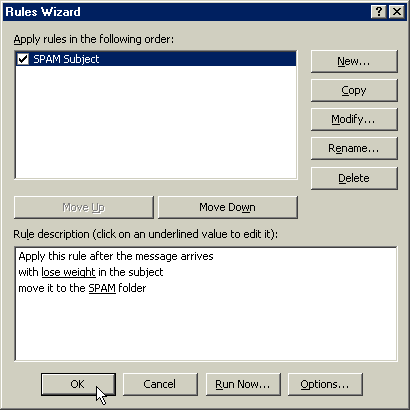
Clicking "OK" will start filtering email. The next incoming email message will be subjected to the keyword and phrase filter you just created. Any emails containing the keywords and phrases in the subject line, will be automatically moved to the SPAM folder.
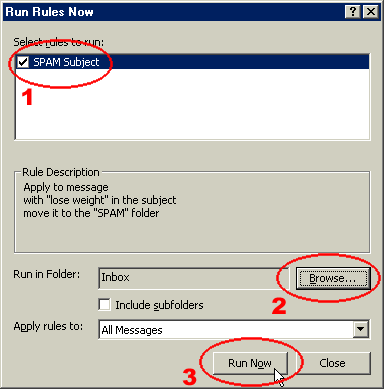
Clicking Run Now will bring up a new dialog box allowing you to immediately run your rules on the existing email in your inbox. First, select the "SPAM Subject" rule. Second, "Browse" to your "Inbox" folder. Third, click "Run Now" which will start the filtering process on all email within your Inbox.
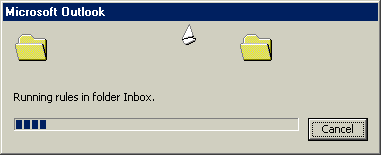
A dialog box will display the status of the filter as it scans your email.
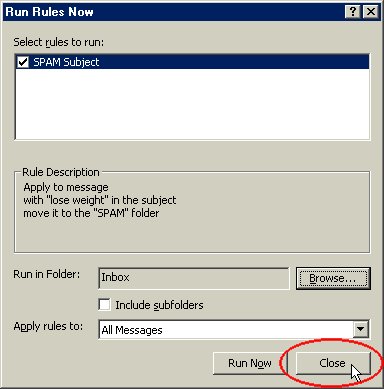
When complete click "Close".
You are finished.
You have just created a SPAM filter for the Subject line of emails. You may want to repeat the process to create a filter for the message body of emails. Over the next few days and weeks you will need to modify your rules by adding or removing keywords and phrases. The more time you spend in "tweeking" your filter rules, the better SPAM filter you will have.
Anytime you need to modify your rules simply:
Click on Tools > Rules Wizard.

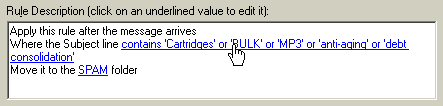
Click on the Subject link in blue - in this case lose weight.

Add or remove keywords and phrases. Click OK when finished and OK once more to return to your inbox.
_____________________________________
OUTLOOK EXPRESS
Creation of a designated "SPAM" folder
The following procedures were tested on Microsoft® Outlook Express® 6.0. You may obtain this program for free by downloading (http://www.microsoft.com/windows/ie/default.asp) and installing Microsoft's Internet Explorer which comes bundled with Outlook Express.
You can find out which version of Outlook Express you are running by starting the program and then clicking on Help > About Microsoft Outlook Express.
Open Outlook Express by double-clicking on the icon located on your desktop

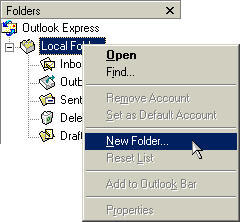
In your folder list on the left side of the Outlook Express interface, right-click (by using the right mouse button) the "Local Folders" and left-click "New Folder".
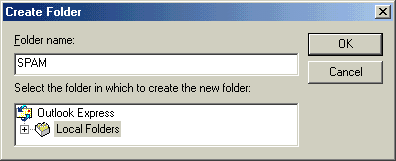
In the Folder name: text box, type the name "SPAM" and click "OK".
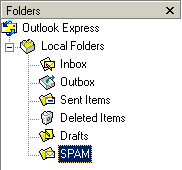
You should now have a folder called SPAM underneath your Local Folders.
Creation of a SPAM Filter
Creation of the filters used to screen out SPAM
Now that you have a special place to dump all of your unwanted mail (your newly created SPAM folder), you need to create the "filter" or mechanism of sifting through your email and moving all the SPAM to the new folder.
The basis for this procedure is to use "catch" words or phrases that spammers use in their emails that you do not normally use in your personal emails. For example, spammers may use the word "viagra" or the phrase "debt consolidation". We will create a filter to key in on these words and phrases and move all mail containing these words to the SPAM folder for later review. The reason why we move them to a designated folder rather than deleting them outright, is so that we catch any personal mail that may have been trapped by the filter. Every once in awhile you will want to delete all the mail in the SPAM folder after quickly reviewing its contents to make sure there are no unread personal emails.
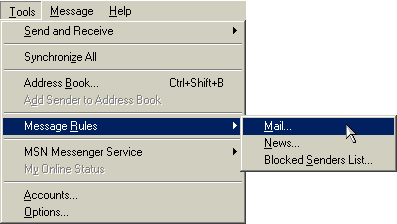
Using your left mouse button click on Tools > Message Rules > Mail.
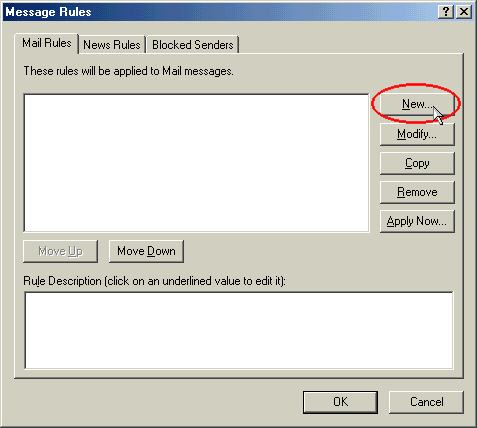
Click on "New" to bring up the New Mail Rule dialog menu.
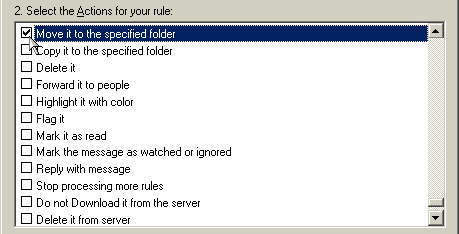
The dialog menu below is where you will be spending most of your time managing your custom SPAM filter. This is a very powerful tool and allows you to do much more than just filter SPAM. We will be separating this dialog menu into four parts.
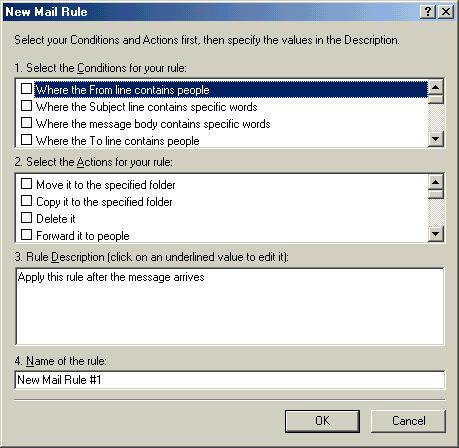
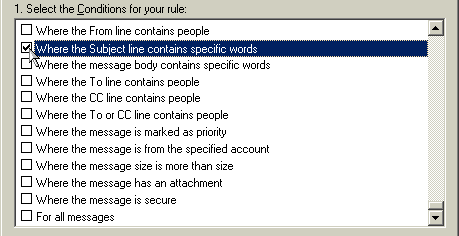
The first section sets the trap for SPAM. We will be focusing on the 2nd and 3rd "Conditions" which relate to words contained in the Subject line and message body. For now, let's set a trap for specific words contained in the "Subject line" by left-clicking the second condition.
The next section tells the trap what you want to do with any email that it catches. We want to "Move it to the specified folder" so left-click the first action.
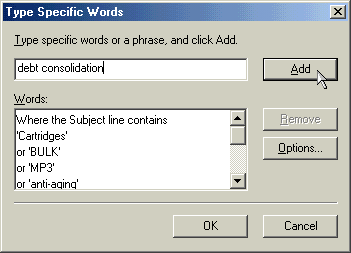
The third section is where you add specific key words and phrases and define the specific folder you want SPAM moved. First, lets define the specific words and phrases to catch SPAM by left-clicking the "contains specific words" link.

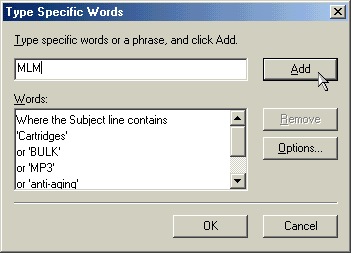
A new dialog box will appear where you can add as many words or phrases as you would like. A good approach is to read you SPAM mail as you receive it in order to choose words that are specific to the SPAM messages that are unlikely to be found in your personal email. I have added a few words below as an example. You may always return to this dialog menu to add new words later so don't worry about being too comprehensive. When you are finished, click "OK".
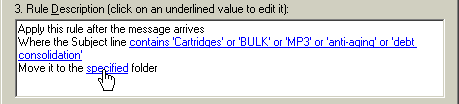
You may now define where you would like to redirect your SPAM. Lets define which folder we would like our SPAM moved to by left-licking on the "specified" folder link.
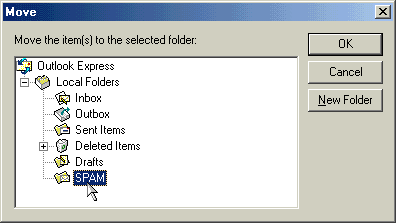
6. A new dialog box will appear allowing you can choose the folder where you would like your SPAM moved. By left-clicking on our "SPAM" folder and clicking "OK" we will be telling our filter to move all mail that contains our previously defined words or phrases to the SPAM folder.
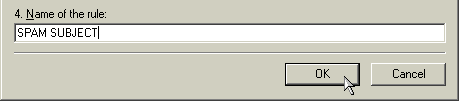
[NOTE: you will notice that instead of creating a SPAM folder at the initial phase of this tutorial, we could have clicked the "New Folder" button at this stage of the tutorial. Often times there are multiple ways to accomplish the same task.]Finally, choose a name for the specific rule that you just created. I named the rule "SPAM SUBJECT" to reflect that I am trapping SPAM by using keywords and phrases in the subject line of incoming emails. Click OK and you will be returned to the main menu.
You have just created your first rule and now have two options:
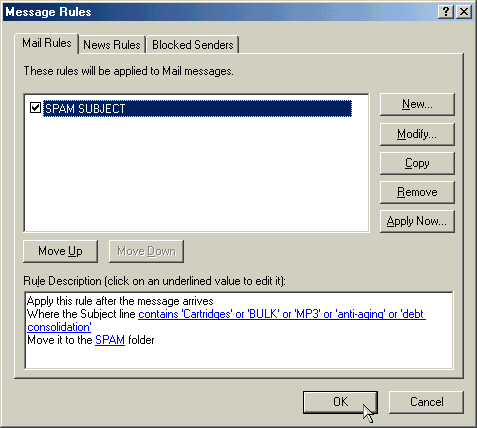
Clicking "OK" will start filtering email. The next incoming email message will be subjected to the keyword and phrase filter you just created. Any emails containing the keywords and phrases in the subject line, will be automatically moved to the SPAM folder.
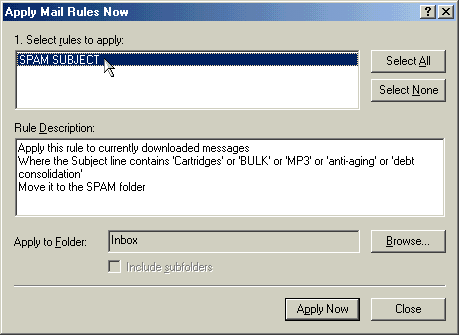
Clicking "Apply Now" will bring up a new dialog box allowing you to immediately run your rules on the existing email in your inbox. Selecting the "SPAM SUBJECT" rule and clicking "Apply Now" will start the filtering process on all email within your Inbox.
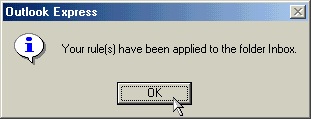
After the filter has completed, you will receive a dialog box indicating that the rules have been applied. Click "OK" , then Close, then "OK" to return to your Inbox.
You are finished!
You have just created a SPAM filter for the Subject line of emails. You may want to repeat the process to create a filter for the message body of emails. Over the next few days and weeks you will need to modify your rules by adding or removing keywords and phrases. The more time you spend in "tweeking" your filter rules, the better SPAM filter you will have.
Anytime you need to modify your rules simply:
Click on Tools > Message Rules > Mail.

Click on the Subject link in blue.
Add or remove keywords and phrases. Click OK when finished and OK once more to return to your inbox.